User guide · cover to cover
Everything ChartBlazer does, in the order you'll meet it.
This guide covers creating an account, building and hearing a chart, marking it up, printing it, sharing it, and taking a setlist on stage. Skim the contents or read it start to finish in about ten minutes.
01Getting started
Create your account
Head to Sign up. You'll pick a handle: 3–20
characters, lowercase letters, digits, - or _. Your handle is your
public name (@handle credits your published charts) and part of your chart URLs,
so pick one you like. Add an optional display name, your email, and a password (at least 8 characters),
and you're signed in immediately. Verification can wait.
Verify your email
A brand-new account can create one chart to try the full editor. A banner at the top of the app reminds you that a verification link is in your inbox (with a Resend email button if it didn't arrive). Clicking the link unlocks the full free plan, 25 charts, and starts your 30-day Pro trial. Verifying is also what lets you publish charts and comment in the community, and it protects account recovery.
You'll land back on your chart list with a green Email verified banner, and a welcome email arrives at the same time. Both mention two things: you can convert your old charts by uploading their PDFs (§03), and every account has a referral link that earns free Pro months (§02).
Logging in and passwords
Log in with your email and password at Log in. Forgot it? Use Forgot password? on the login page. We email a reset link that lets you set a new one.
Finding your way around
After signing up you land on Your charts, home base. The top bar has the main sections: charts, gigs, and community. In the upper right: Help (the FAQ and this guide), Feedback, and your @handle: click it for the account menu, which holds Account, My grooves, Settings, Send feedback, About and Log out. Those are six separate destinations. "The @handle menu → Settings" means click your handle, then Settings, without going through the account page.
02Plans, trial & billing
The philosophy: Free builds and keeps your charts; Pro makes you gig-ready. Full details on the pricing page.
| Free: $0 forever | Pro: $59/yr or $9/mo | |
|---|---|---|
| Charts | Up to 25 | Unlimited |
| Full editor, notation & dynamics | ✓ | ✓ |
| Sample playback + metronome | ✓ | ✓ |
| Markup (pen, highlight, notes) | ✓ | ✓ |
| Offline reading / installable app | ✓ | ✓ |
| Community: publish, clone, comment | ✓ | ✓ |
| Browser print to PDF | ✓ | ✓ |
| One-click PDF download | — | ✓ |
| Gig Blazer setlists + stage view | — | ✓ |
| Whole-setlist PDF | — | ✓ |
| AI chart drafts and MP3 conversion (§03) | – | ✓ credits with every payment (see the amounts) |
The 30-day trial
Every account gets a card-free 30-day Pro trial, starting the moment you verify your email. The trial unlocks Pro features, setlists and server PDF, but keeps the 25-chart cap; unlimited charts is a paid-Pro perk. The AI features (§03) come with AI credits: enough for a couple of drafts and a couple of recordings, so you can judge them on your own songs before you pay. They don't expire, and subscribing during the trial tops you up to a full month straight away. The current amounts are on the pricing page. When the trial ends you drop to Free and nothing is taken away (see the note below).
Upgrading, managing, canceling
Go to Account → Billing & plan and pick a plan: $59 / year or $9 / month. If you subscribe mid-trial, your remaining trial days are added on: you aren't charged until they're used. Once subscribed, a Manage subscription button on the same page opens the billing portal, where you can update your card or cancel. Cancelling keeps Pro until the end of the period you've already paid for.
Refer a drummer, earn free months
Every account has a referral link. On the Account page, the Refer a drummer card mints yours the first time you press Get your referral link, then copy it and pass it to the drummers you play with. Each one who signs up through it and buys the annual plan earns you 3 free months of Pro, once per drummer and with no cap on how many drummers you refer. The months are added to whatever you already have. If you're on a paid plan they push your renewal date out. If you're not, they turn Pro on for three months.
A referral who picks the monthly plan still counts as a signup, but only annual purchases earn the months. See your referrals on the same card opens a small dashboard of who has signed up and how many free months you've earned. If you're sending a lot of drummers our way, that card also points you at the partner program.
Redeeming a code
If we've sent you a code, such as a beta invite, a comp, or a thank-you, the Have a code? box under Billing & plan takes it. Codes
look like CB-XXXX-XXXX and grant Pro for a set stretch of time with no card involved.
Redeem two and the days add up rather than replacing each other, and if you subscribe later, the
days you have left roll into your subscription. You aren't charged until they're used. Redeem
a code before subscribing if you can. One redeemed during an active subscription runs alongside
it instead.
03Your first chart
Ways to start from Your charts:
- + new chart: a blank page.
- ✨ AI draft: name a song, or describe a feel, and get a starting chart to fine-tune. A Pro feature; what it does well and where to check it is just below.
- Samples: worked demo songs, from the samples link on your chart list: one written as a chart, one as a flow chart (§06). Read either and play it in full to see how a finished song is put together, then Use as template to start your own editable copy. They stay there whether your chart list is empty or not.
- Clone from the community: browse public charts and clone any of them into your account as your own editable copy (§10).
- Duplicate one of your own: the duplicate icon on a chart's row copies it whole, which is how you keep a second arrangement of a song you've already charted without starting over.
Drafting a chart from a song
✨ AI draft on your chart list takes a song name, or a description of a feel, and writes a starting chart: the form, a bar count and one representative groove per section, with cues saying what you'll hear. It opens in the editor like any other chart, and every part of it is yours to change. It's a Pro feature, metered in credits: every Pro payment adds credits to your balance and they never expire, so whatever you don't use stays yours. The trial comes with its own credits to try them on. Your usage page shows your own numbers and what's left, and the pricing page has the current amounts. You pick the quality each time: Outline is the quickest and cheapest, Quick half the cost of Best, Best our recommended balance, Finest the most capable model at the highest cost. Dearer drafts cost more credits, and the page names the price before you press it. An unusually long chart is the one thing that can cost more than the quoted number, and a draft never costs less.
The draft is built from what the model has read about the song, not the recording. That explains its strengths and its limits:
- Well-known songs come out closest. The more a song has been written about, the more of its real shape survives: an odd-time section, a drums-out intro, the breakdown before the last chorus.
- It says when it's guessing. Ask for something obscure and it tells you so in the chart's description, then gives you a sensible form for the style to edit from rather than inventing details.
- Describing a feel works as well as a song title. "A slow 6/8 worship ballad, drums in at verse 2" is a perfectly good prompt, and it's how to draft a starting point for a song of your own, which no model can know.
- Check the bar counts against the record. With nothing but a song name, section lengths are plausible, not measured. Paste or upload a sheet whose sections can be read and they follow the sheet instead: a count it states, else one bar per printed line of a sung section, else blank. Add a reference track (below) and the draft becomes a listening checklist.
- Cues come from your sheet. Paste the lyrics, or a chart from any app, and each sung section's cue is its first three words, in teal. With nothing pasted the cue column comes back as landmarks instead, like "drums enter" or "big double chorus".
- It's a chart: one groove per section, like anything else you'd write here. The fills stay yours.
Writing a better prompt
What you type goes to the model exactly as written, and length doesn't affect the price. A draft costs the same credits at four words or four lines. Only an unusually long chart costs more, never a long prompt. Spend the words on what the model can't already know.
- Get the title and the artist exactly right. The whole draft is built from these, and a near miss doesn't fail outright. It can chart a different song, or invent one. Check the spelling before you press.
- Say which recording, and state the tempo. Many songs exist as a studio cut and a live one at a different speed. Without a number, the model uses its own guess at the tempo. "The live version, at 72 bpm" settles both, and the chart's own tempo box is there to correct it afterwards.
- Describe your arrangement, not the record's. A longer prompt helps most here. The model may know the album, but it can't know that you skip the second verse, vamp the bridge an extra eight bars, or end cold.
- Ask for sticking, rolls or time slashes if you want them. They are left off unless the prompt asks, so a chart comes back uncluttered by default. "Sticking on the bridge fill", "slashes through the verses".
- Name the kit you don't play. No china, no ride bell. Say so and you won't spend the first minute deleting lanes.
- Don't type bar counts you're guessing at. Without a sheet, left alone it drafts round, plausible lengths and says so. With a sheet, it leaves bar counts blank instead of inventing one. Either way, a confidently typed wrong number is used as is.
From a recording
On the same page, choose your files: a recording (mp3, wav, flac or m4a, up to 15 minutes and 30 MB), a chart PDF, a photo of a chart, or any of them together, and the page works out which is which. With a recording, ChartBlazer measures the tempo, finds the sections, counts their bars, and notes the feel: drums out, four on the floor, 16th hats, taken from your recording rather than the album. The numbers here are measured, not guessed, so use this path when the bar counts have to match a specific take. Conversion takes a couple of minutes, and the page shows the job's status until your chart is ready. It's a Pro feature. One conversion costs one credit from the same pool as a draft. We email you when it's done, and if it fails we email you why, with the conversion credit unspent.
A chart PDF on its own is read rather than heard: the section names and order, the playing directions and the first words of each section come off the sheet, and the grooves are drafted from them. When the sections can be read off the sheet, one per line the way a chord chart writes them, bar counts follow the sheet: a count it states, else one bar per printed line of a sung section, else blank, and the chart says which. Check them as you play it through, or add the recording and let ChartBlazer count them. A chart laid out as a grid keeps the counts the draft gives it.
Pick a draft quality and the AI labels what was measured: real section names, cues and playing notes in place of the lettered guesses, priced like a draft at the quality you picked, from the same credits. Type the song's name in the prompt box beside your upload and it labels them from the song it knows; pick None and you get the measured chart with lettered sections and no AI call. Either way the measured numbers are never touched: the AI only labels, it never changes a tempo or a bar count.
Bring the charts you already have
Switching from another charting app? Upload a PDF of the chart on the AI page, the same box that takes a recording takes a chart, a photo of one, or pasted text, and it comes back as a draft: the section names and order, the playing directions and the cues read off the sheet, the grooves drafted from them. When the sections can be read off the sheet, bar counts follow it: a count it states, else one bar per printed line of a sung section, else blank. Check it against the original. If a chart won't convert, send it to the address on your empty chart list or in the FAQ and we'll do our best to convert it by hand. Every app's PDF is laid out a little differently, so there's no guarantee a particular chart makes it across, but anything that converts lands in your account fully editable.
Finding a chart again
Once you have a few, Your charts is a table you can work: a search box matches title and artist, the Title, Artist, Genre and Updated headers sort (click the one you're already on to flip the direction), and the list pages at 25 charts with the page links below it. What you searched and sorted rides in the address, so a view you like is a bookmark. The Shared with you list sits below your own charts, if anyone has shared one.
The chart header
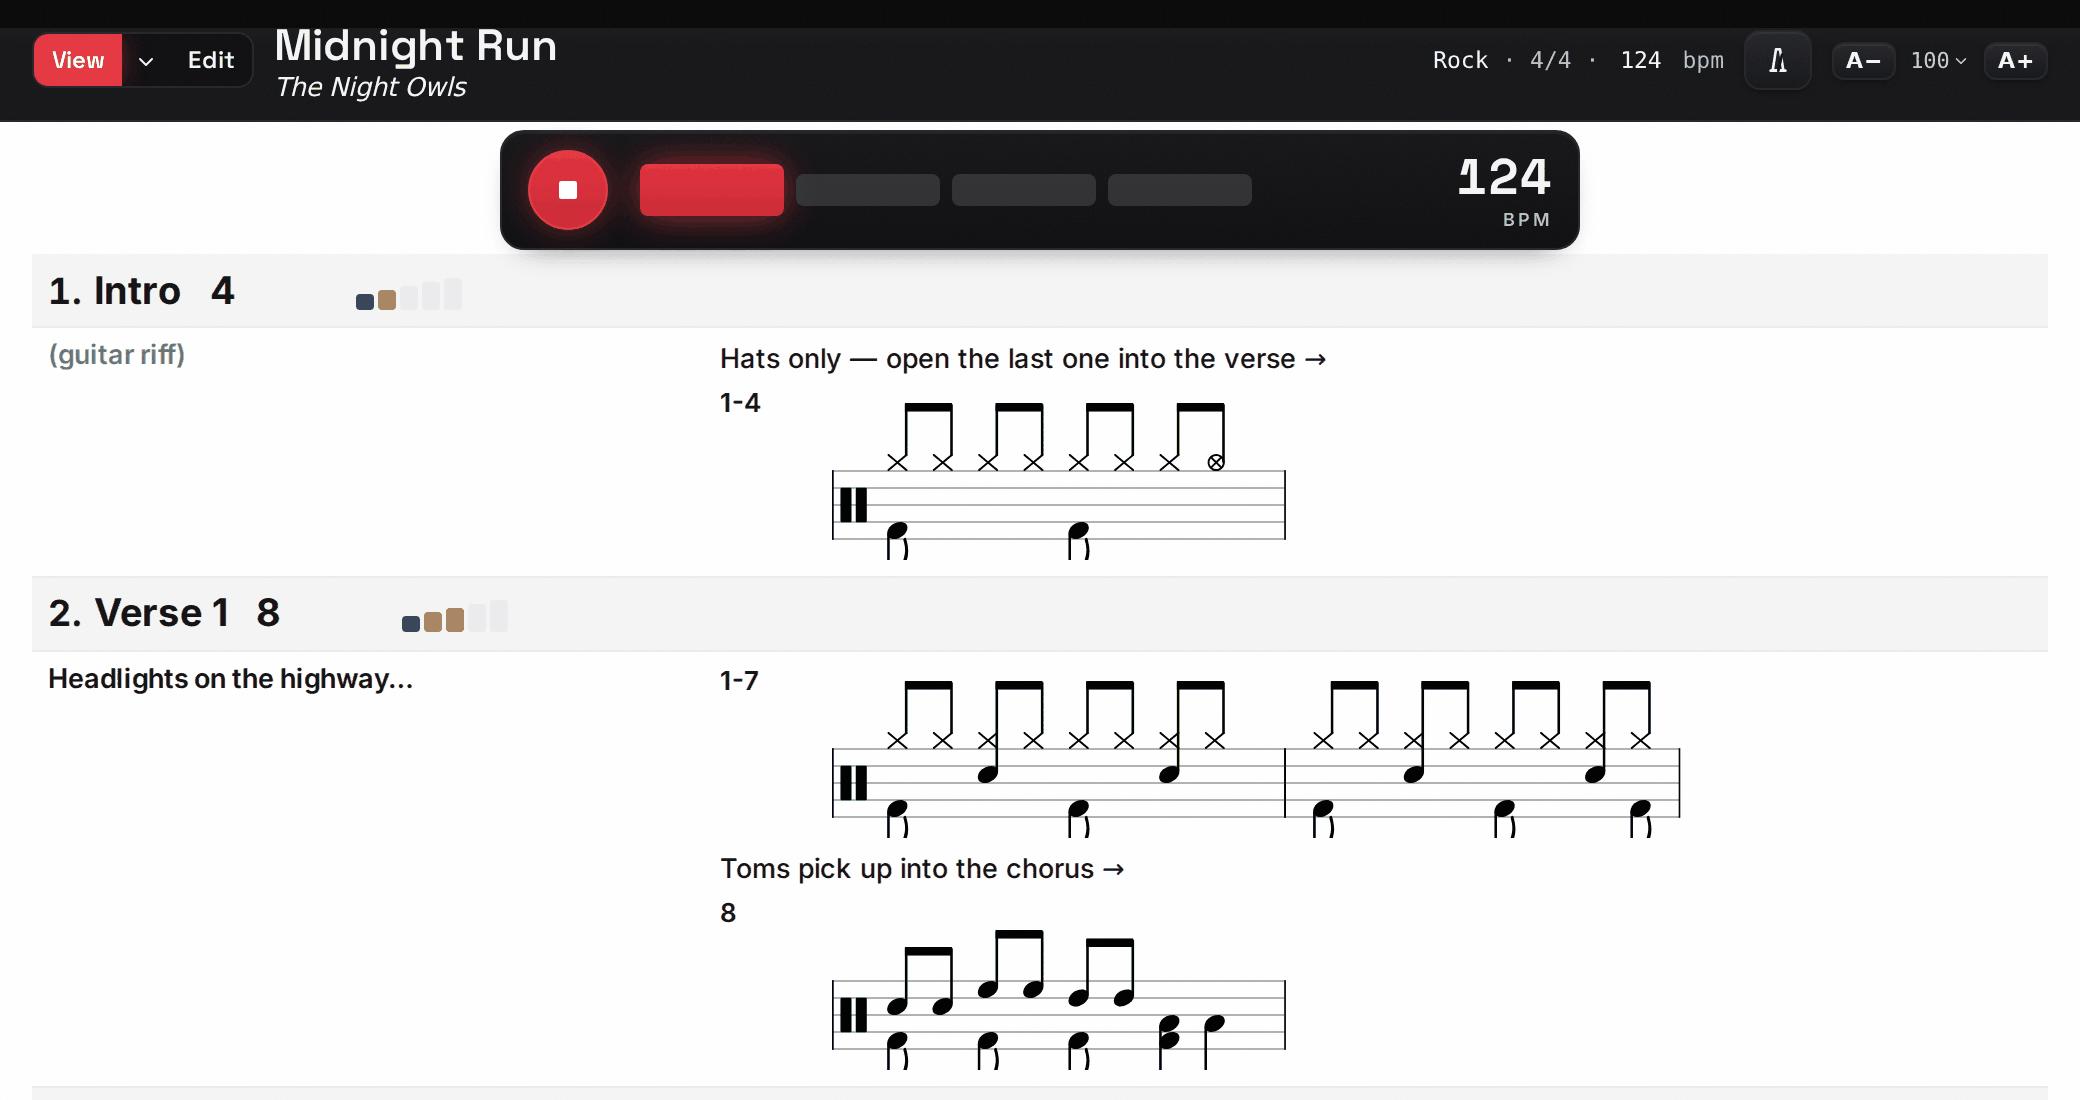
At the top of every chart: the title and artist, a genre (this is the tag community browsing filters on), the time signature (eight common signatures from 2/2 to 12/8, plus Custom…, this one labels the chart for readers and drives the metronome; each groove sets its own grid in the step editor, see §05), and the bpm: playback and the metronome follow it. A description field below holds working notes; it prints only if you ask (§09).
Reference track
Paste a YouTube or Spotify link into reference track and readers get a collapsed chip that expands into the real song's player, right beside the chart, handy for checking a feel against the record. Nothing loads until it's clicked.
Deleting a chart
The trash icon on a chart's row in Your charts deletes it, after a confirm, and permanently (there's no undo for a deleted chart). Deleting is also how you get back under the 25-chart cap if you've hit it.
04Sections: the rows of a chart
A ChartBlazer chart is a list of song sections, like Intro, Verse and Chorus, one row each rather than bar by bar. This keeps a whole song on one page. Each row has:
- Section name: type anything, or hit the ▾ beside it for standard names (Verse, Chorus, Bridge…).
- Bars: how long the section runs. Usually a number, but it's free text, so
the way you'd write it on paper works:
8+8for a section played twice,8+1for eight bars and a tag, orOUT. - Energy meter: a 1–5 intensity bar (green → red), so the dynamic arc of the song is visible at a glance. Tap a segment to set the level; tapping the top lit segment steps it back down (all the way to off).
- Cues: a free multi-line column for short lyric fragments, counts, or anything that tells you where you are. A cue line, not the whole lyric. Drag the column's edge to resize it; double-click the grip to reset.
- Notes & notation: an ordered mix of text notes and grooves (§05).

Every section carries the same controls (edit mode). Move up/down, insert below (⌘/Ctrl+Enter), duplicate and delete sit right on the section's header line whenever it's wide enough to hold them. On a narrow screen, or in a two-column layout where each section is only a few hundred pixels across, they move into the ⋯ button beside the name to keep the line intact. The ⋯ also holds this section's A− / A+ sizers: its title, its cues, its text and, once the section has a groove in it, its grooves, each on its own, and its outline color: a colored accent that tints the row, great for marking all choruses at a glance. Nothing sits inside a row. Every control is on the header line above it or in the ⋯ menu.
Sections are numbered automatically, 1., 2., 3. beside each name, and renumber themselves the moment you reorder, insert or delete one.
You don't have to colour a chart a section at a time. While editing, the palette button on the markup line offers Auto-color sections: every section named something standard, such as Intro, Verse, Pre-Chorus, Chorus, Bridge, Solo, Outro and the rest, takes your colour for that kind of section, and Clear all colors takes them off again. Out of the box the scheme marks the two landmarks, choruses blue, bridges gold, and leaves every other kind clean; give any of them a colour of their own in Settings → Chart colors. Numbered sections follow their parent: Chorus 1 and Chorus 2 take the Chorus colour, but a colour you picked yourself always stands: give one Chorus its own and every later press leaves it be. Sections you named your own way are left alone too, colour and all. You can also tick Color on name change there or in the same menu to have each row take its colour the moment you name it.
Text notes
Note lines are rich text: bold and line breaks. To colour text, switch to Select and pick a swatch on the markup bar (see §08), the same swatches that ink your pen when a pen is selected. Select a few words in a note to tint just those, or click into a section name, bar count or cue and the whole field takes the colour. Black is the default, so the black swatch clears colour back off.
An empty note line doesn't show at all, on any surface. Press + text when you want one and it opens ready to type; leave it blank and it folds away again. A chart shows exactly the lines you wrote, even while editing. The editor and the printed page always match.
A "repeat" in ChartBlazer is a note: a section with no grooves and a line saying "Verse groove", the way a paper chart would show it.
05Grooves & the step editor
A groove line is real percussion notation, engraved for you. Instead of dragging noteheads on a staff, you tap hits onto a coarse grid with big targets, built for tablets. ChartBlazer renders two-voice drum notation: cymbals and snare stems-up, kick and floor tom stems-down, beamed and spaced automatically.
Add one with + groove ▾: press New blank groove to start
from scratch, or Pick a groove to browse every groove already in this chart
plus the library you've saved, with the notation shown right on the card. Either way you
land straight in the step editor on the groove you just added, no hunting for a blank line
to tap. The small bars field says which bars of the section the groove covers, as a plain
expression: 1, 1-4, or 1,3,5. The numbers refer to the section's
own bar count: a section with 8 bars might carry one groove for 1-4 and another for 5-8. Bars no groove covers are fine. They show
no staff, the way a paper chart would. Tap the notation itself to open the step editor, in Edit. The same tap in View
plays the groove.
Inside the step editor
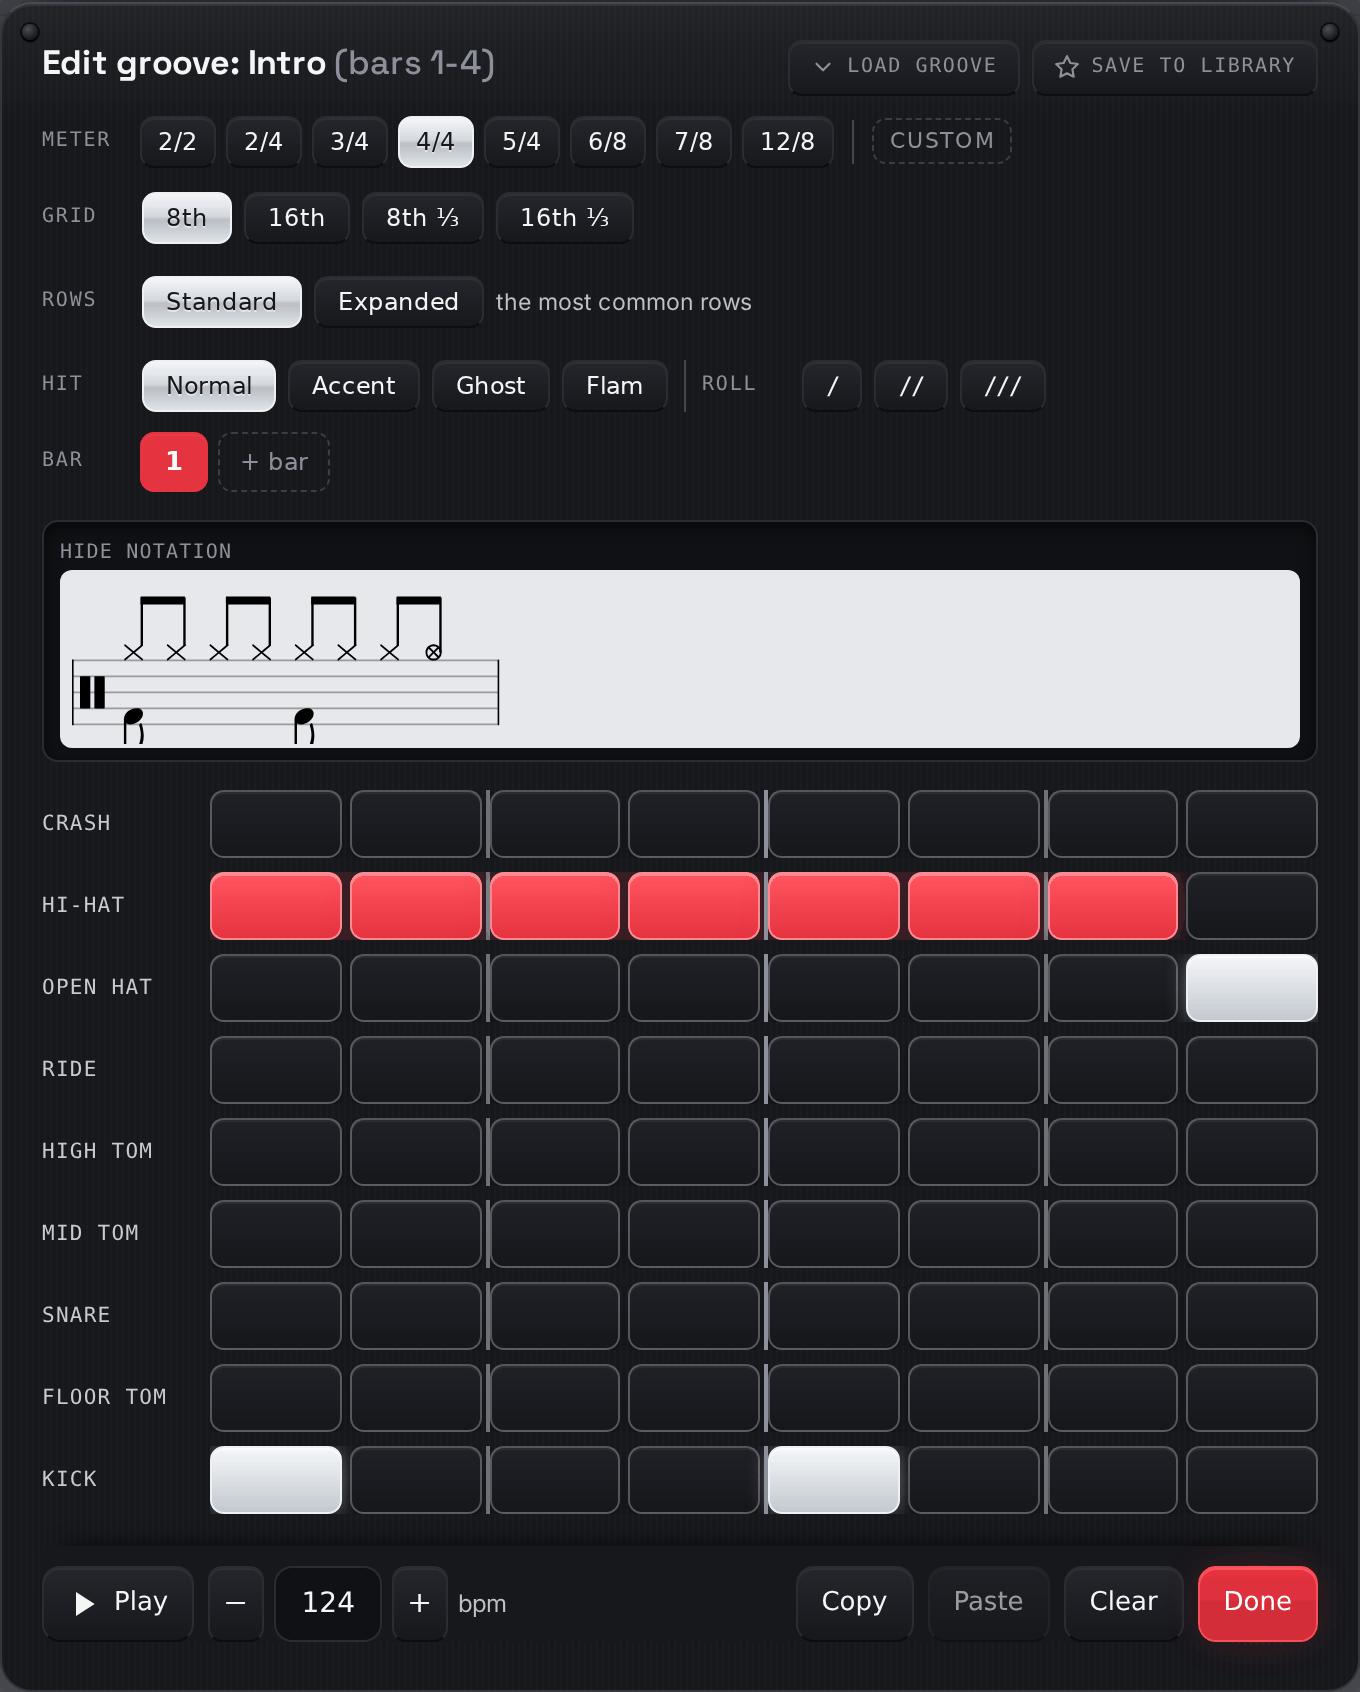
- Meter: signature shortcuts (2/2, 2/4, 3/4, 4/4, 5/4, 6/8, 7/8, 12/8, the same list as the chart header) or a Custom stepper for any number of beats. Odd meters are first-class: 7/8 is a preset, and 5/8 or anything rarer renders, counts and plays just as exactly from the Custom stepper. Tap 6/8 and you get compound beaming (3+3). That grouping is the whole difference between 6/8 and 3/4, since both are six eighths. Use the preset rather than counting six beats on the Custom stepper. 2/2 works the same way: eight cells beamed 4+4, counted two to the bar, where 4/4 beams in twos and counts four. Note that the grid is separate from the chart header's time signature. The header labels the chart and drives the metronome, while each groove's grid is set here. Set the header first and a new empty groove starts in that meter, which saves you the step.
- Grid: the subdivision each column represents: 8ths, 16ths, or their triplets. Switching resamples your hits proportionally, so a groove survives the change.
- Hit brush: Normal, Accent (engraved
>), Ghost (parenthesized notehead), or Flam (a grace note just before the beat, usually a snare thing, but you can flam any drum). Tap a cell to paint, tap again to clear. Playback honors all four: accents hit harder, ghosts softer, and a flam plays as the two strikes it is. - Roll brush: one, two or three slashes through the stem, the way doubles and rolls are written. A roll is a separate mark from the dynamic rather than another kind of hit, so an accented roll is two taps and neither undoes the other; it is set per instrument, so rolling the snare leaves a hi-hat on the same step alone. Playback strikes the note twice, four or eight times across the cell, never faster than the tempo could actually be played. Slashes on a kick or floor tom hang below the staff, so a groove carrying one is drawn slightly smaller to make room, the same way sticking is.
- Sticking: the row under the kit: tap a step for R, again for L, again to clear. The letters read under the notes on the chart, the way a method book prints them, and only where there is a note to play. A groove that carries sticking is drawn slightly smaller so the letters cost the chart no extra height.
- Bars: a groove can span multiple bars: + bar adds one, the numbered tabs switch between them, and + 𝄎 adds a repeat-previous-bar, drawn condensed with the one-bar repeat sign.
- Rows: what the grid shows. It opens on your Standard view: kick, snare, two rack toms, floor tom, hi-hat, ride and crash. The Standard / Expanded toggle brings in the rest of the kit: china, open hi-hat, foot hi-hat, ride bell, cowbell and cross-stick, along with the three rows that aren't instruments: Sticking, the Ensemble figure (flow charts) and / time slashes. A row that already has something written in it is never hidden from you. Which rows count as standard is yours to set in Settings (§13), so a kit piece you don't own, or a mark you never write, stays out of the way.
- Groove library: beside the editor's title, load groove replaces this line's pattern with one you've saved, or with any groove already in this chart: a chart offers its other groove lines, a flow chart the distinct bars the piece uses. save to library keeps the current one for reuse in any chart. Saved grooves are managed under My grooves in the @handle menu (§13).
- Footer tools: loop Play at the chart bpm while you tweak, with − / + bpm steppers beside it that nudge the tempo mid-loop and follow along live. That is the chart's own tempo you're moving, so you can hear whether a groove only works at a slower speed. Then Copy / Paste / Clear for the bar you're on, and Done.
- While you work: the engraved staff sits above the grid and re-draws on every tap, so you read the notation as you build it; hide notation folds it away if you'd rather have the room. On a wide enough screen a 1 bar / 2 bars switch puts two bars of a multi-bar groove side by side.
06Flow charts — every bar on a staff
A chart is one row per song section, each carrying a representative groove. A flow chart writes the whole song out instead, with every bar on a staff, wrapping across the page like printed sheet music. It uses the same tool, the same editor and the same 25-chart limit. Pick whichever one you read more easily.
Start one from Your charts with + New flow chart, right beside + new chart. Tap a bar to open the same step grid you'd use on a chart (§05), every bar is its own little groove, so nothing about editing one changes.
Inside that editor, next to the ‹ › bar navigation, sit five more controls: + bar inserts an empty bar right after the one you're on, inheriting its meter; ⧉ duplicate copies it; × remove deletes it; ⏎ new line forces that same bar to start a fresh line, wherever it would otherwise have landed, it's a toggle, so pressing it again puts the bar back where the music would normally wrap it; and / slashes draws the whole bar as time slashes: one per beat, the "keep time" bar a big-band or jazz part is mostly made of. Whatever you'd written in the bar is kept and comes back when you toggle it off. The + bar button at the bottom of the page works the same way, just at the very end, and if you ever delete every bar on a flow chart, it's the only way back in.
For part of a bar, use the / time row at the bottom of the bar editor, under the sticking row: tap a beat and just that beat reads as slashes, so you can write the figure the band hits on beat 1 and leave the rest of the bar as time. There's one target per beat: four in 4/4 however fine the grid is, two in 6/8, because that's how a part is printed. Slash every beat and it becomes the whole-bar version above; take one beat back out of a whole-bar slash bar and the other beats stay slashed. Playback is unchanged either way: slashes are what the page says, so a bar still plays whatever notes are stored under them.
That row is on ordinary charts too. Open any groove's step editor and it's there, under the sticking row, one target per beat, and a column per bar of the groove. It is the same idea in a smaller space: write the figure the band hits, leave the rest as time. The one difference is that a chart has no whole-bar / slashes button beside it, because a groove can be several bars long and one button would have to mean "which one"; so on a chart you slash every beat of a bar to get a bar of time, which reads exactly the same on the page.
The Figure row above those two writes what the band plays rather than what you play. Tap a step to draw an ensemble hit above the staff, tap again for an accent, and once more to clear it. Unlike the / time row, you can tap any step, on or off the beat, since a horn figure can land anywhere. This is the core of a big-band bar: kicks written above, time slashes below, and how you catch them (crash, snare, kick, or nothing) is up to you. A figure is never played back. It shows the part rather than telling you how to play it.
Each bar carries its own text box for a lyric cue, a section title, or a note, and the same pen, highlighter and eraser from the markup toolbar draw right over the staff, exactly as they do on a chart (§08). A bar with nothing notated on it is normal. A staff carrying only a cue or a pen mark still counts as a finished page. Write out only the bars you need to see.
Printing follows the music, not a fixed page count. A chart is built to fit one sheet, but a flow chart prints across as many pages as the song runs, like printed sheet music.
07Playback
Playback uses real drum samples, at the chart's bpm, with accents, ghosts and flams at their proper dynamics.
- Tap a groove in View: loops just that groove at the chart tempo. Tap it again to stop; one groove plays at a time.
- Tap a bar in View, on a flow chart: the same gesture, a different meaning: it plays the song forward from that bar rather than looping it, so you can start anywhere in the piece. The play button beside the metronome icon takes it from the top, and stops it again (§06).
- Metronome: the metronome icon in the chart's top-right tools, available in both View and Edit: a click track with a flashing beat row, independent of any groove. Count a song off on stage without playing the chart.
08Reading, performing & markup
View and Edit modes
The View / Edit toggle sits at the top of every chart. View strips the editing controls for a clean, gig-readable page. Charts open in View by default (a chart you just created opens in Edit). The layout is identical in both modes: A− / A+ zoom, per-section title, cue, note and groove sizes, page width, one column or a two-column newspaper flow. You build the chart in the shape you'll read it in, so your pen marks stay in place when you switch. Notation auto-fits its column in both modes, so a groove never runs off the page.
The title line stays visible as you scroll a long chart, along with the mode toggle, the size steppers, the print button, and, while editing, the pen and colour swatches. It holds its place on your own charts, on the gig stage, and on the samples.
Chart size
A− / A+ in the title line sizes the whole chart: section names, bar counts, cues, notes and the notation together. Tap the percentage between them to size the four parts separately: Titles (the section name and bar count), Cues, Text (your note lines) and Grooves. Useful when you want large names and cues to glance at but small notes, or large grooves without enlarging everything else. Any one section can then be nudged off those settings from its own ⋯ menu.
A flow chart is offered three of those four. It draws no section header, so there are no titles to size and no per-section ⋯ to refine from. The bar text sizes under Cues, and Grooves sizes the staves, which is also what re-wraps the music onto more or fewer lines (§06).
The View ▾ menu
The caret beside the toggle holds three reading choices, and the two layout ones apply while you edit as well as while you read:
- Columns: one, or a two-column newspaper flow that fills the first column top to bottom, then the second. Good for getting a long song onto one screen or one sheet. Charts only: a flow chart already wraps its bars across the page, so there is no second column to pour them into and the choice isn't offered there.
- Tap to play: Plays it or Stays quiet. Reading a chart, a tap on a groove loops it; on a flow chart, a tap on a bar plays from there (§07). Switch it to Stays quiet for a stage where a stray touch must not start anything. It changes nothing about editing. A tap there opens the step grid either way.
- Page width: Normal, Wide or Full. Normal keeps a comfortable reading width; Full lets the chart use the whole screen, which is what you want on a tablet in landscape that would otherwise sit boxed in the middle with dead space each side. Remembered per device.
The metronome (below) has a switch of its own in the chart's top-right tools, beside the size steppers.
Markup
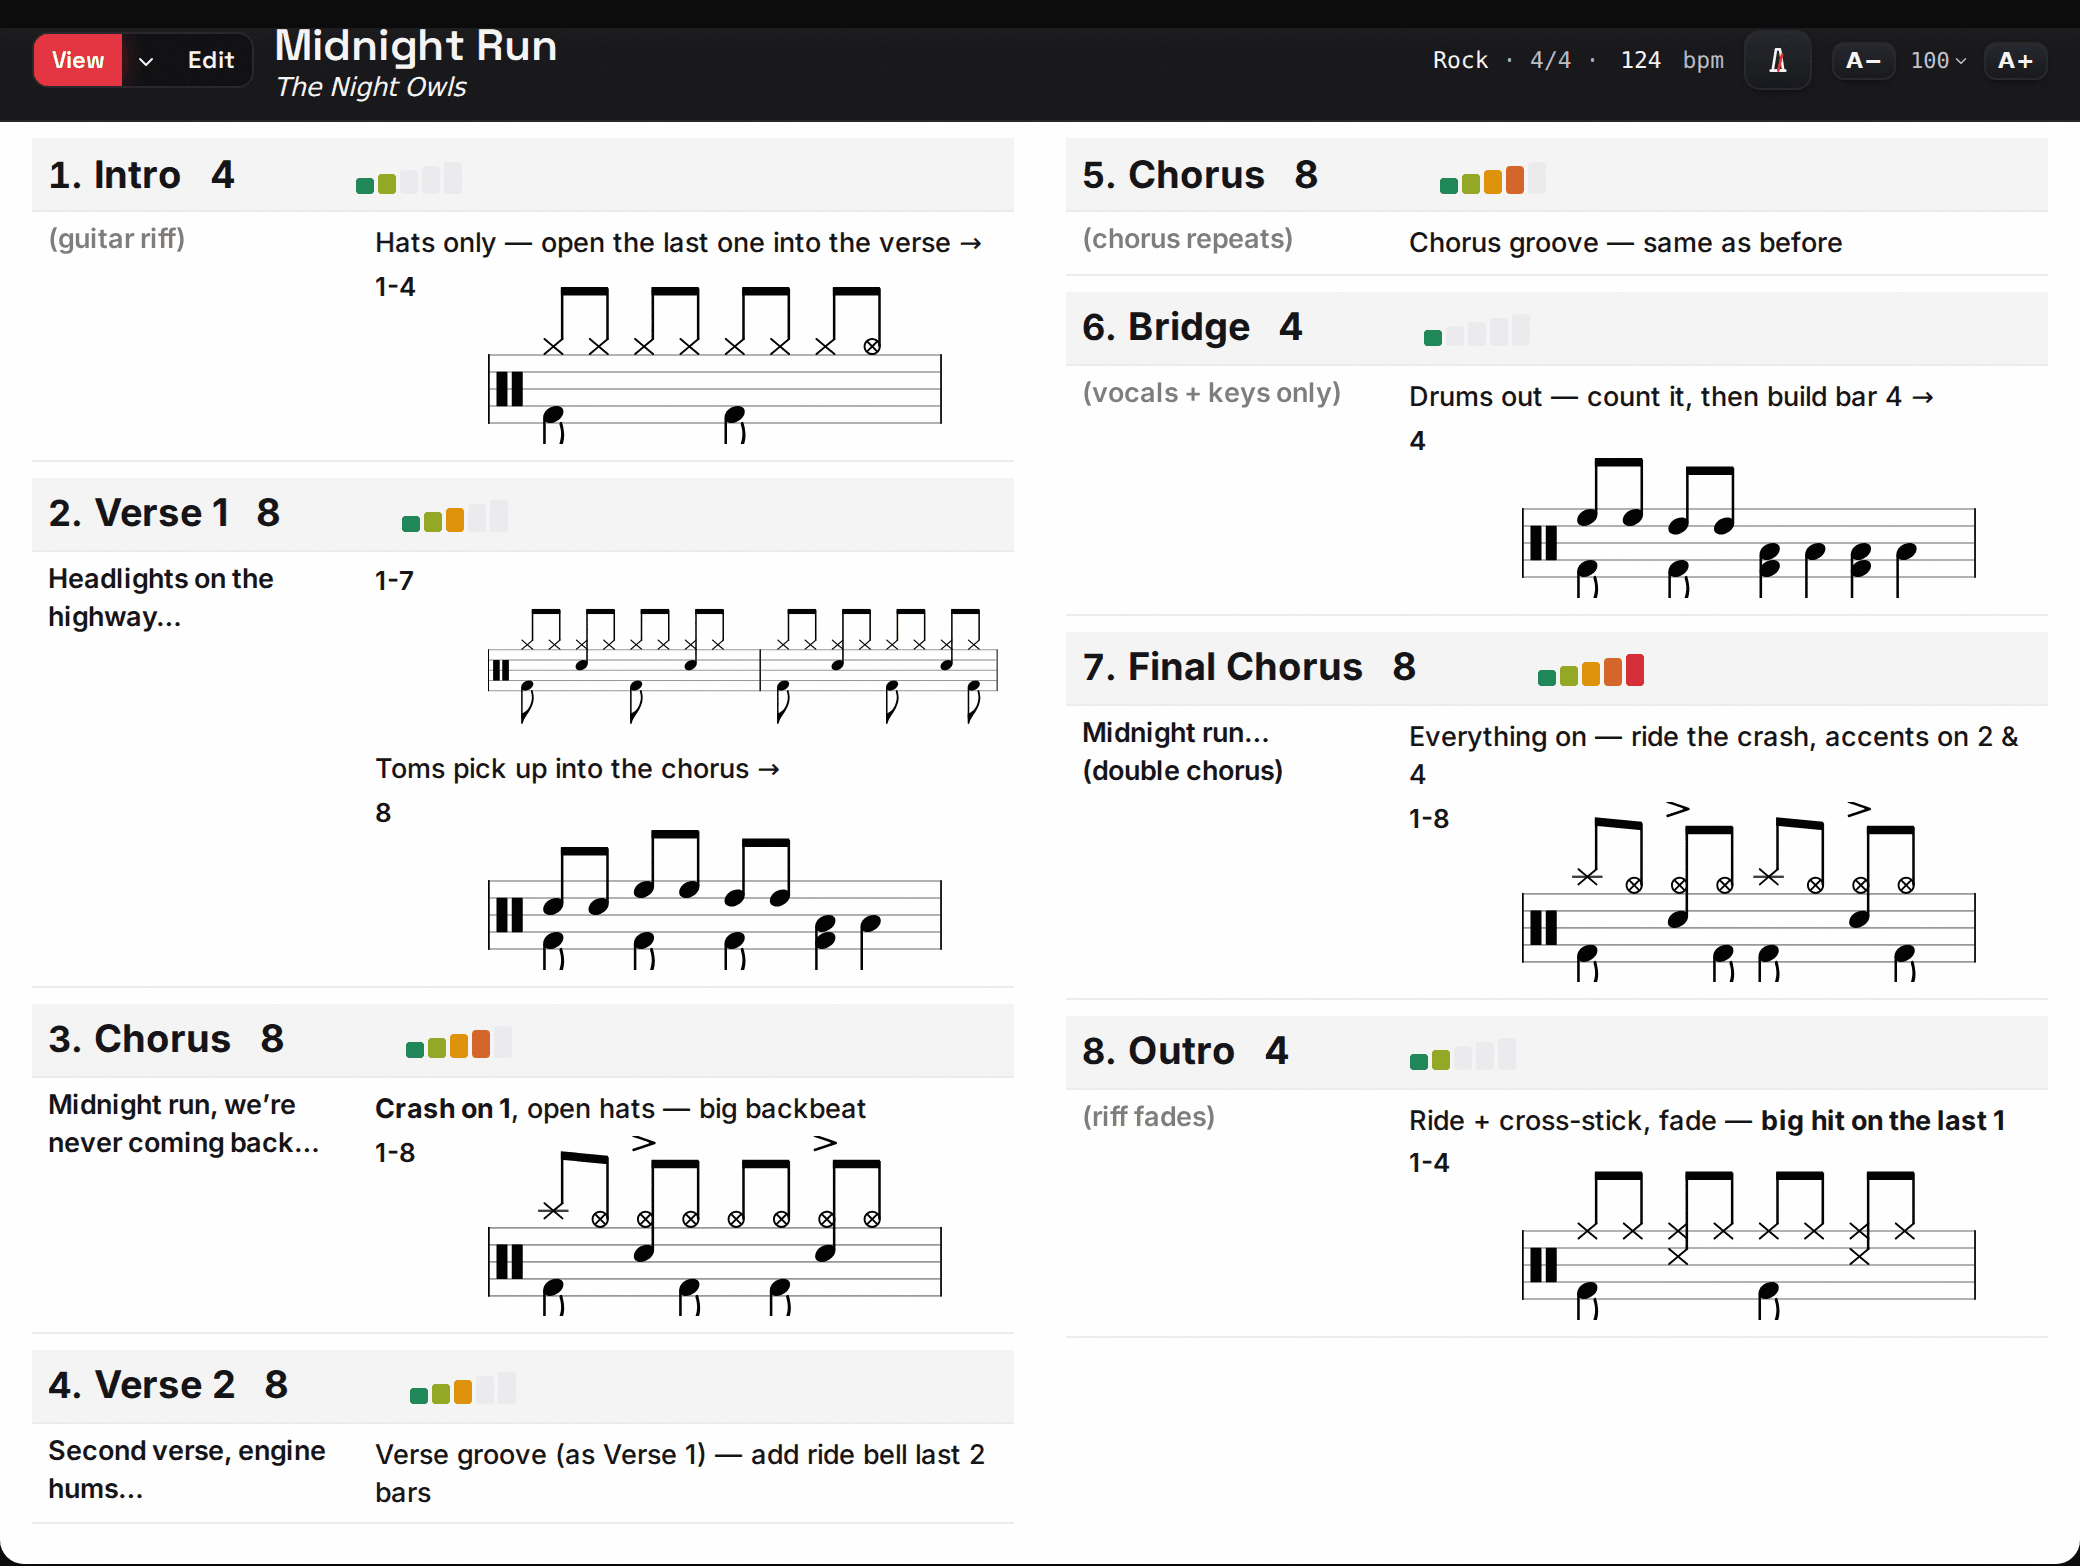
You draw in Edit mode, that's where the Markup toolbar lives, and the ink then shows everywhere you read the chart: View mode and the gig stage. The toolbar offers Pen, Highlight, Erase, and Note (placed text), with pressure-sensitive stylus support. The pen carries six ink colours and the highlighter a fixed yellow. Pen, highlighter and eraser each take a Small / Medium / Large size, and each remembers its own, so a fine pen and a broad highlighter don't fight over one setting. Switch back to Select and the chart underneath is editable again. Your markup stays put, and that same swatch row colours text instead of ink (§04). Clear wipes it all (after a confirm). Markup is a screen-and-stage layer: it stays on your chart wherever you read it in the app, but it is not included when you print or export a PDF. Printing re-lays the chart out to fill the paper, so ink drawn at the screen's width would land in the wrong place. Markup is left off the printed page.

Offline & install
ChartBlazer is installable. Add it to your home screen from the browser menu and it opens like an app. Any chart or gig you've opened online is cached for offline reading, so you still have your charts in a venue with no signal. A small offline pill appears anywhere in the app the moment the connection drops, so you always know which side of it you're on. (Editing offline is on the roadmap.)
09Printing & PDF
The Print ▾ menu in the chart header offers Fit to one page (on) and a Description checkbox (off by default, those are working notes) and then:
- Print (browser): free for everyone. Opens a clean print view and your browser's print dialog; "Save as PDF" there gives you a PDF at zero cost.
- Download PDF: Pro. A finished PDF rendered on our servers, reproducing the chart's sections, cues and notation as the reading view shows them, sized to fill the page, one click, no print dialog. Gigs get a whole-setlist version (§11).
Fit to one page
Fit to one page is checked by default on every print path for a chart: its browser print and its PDF, and a gig's whole-setlist print and PDF. It scales the chart down until the whole song lands on a single sheet, one scale for the whole chart so nothing gets out of proportion with anything else. In a setlist each song is fitted on its own, since each already starts a fresh page. A flow chart is not offered the checkbox at all: it re-wraps rather than shrinking, so it prints across as many pages as the music runs (§06), and in a setlist it still starts its own fresh page like every other song.
It only ever shrinks: a chart that already fits prints exactly as it reads, and is never blown up to fill the sheet. There is no lower limit. A very long chart squeezed onto one page can come out too small to read, and clearing the checkbox stops the shrinking. Unchecked, nothing is resized and the chart takes however many pages it takes.
If you turned on the two-column layout, printing keeps it. Page width is a screen setting. Print always lays the chart out to fill the paper. Pages are US Letter, portrait.
10Sharing & the community
Private sharing with your band
Every chart starts private. The share button in the chart header opens Sharing & visibility: under People, add a bandmate by @handle or email. They need a ChartBlazer account already. No invite email is
sent, so pass your @handle around the band and have everyone sign up first. Private sharing
is a Pro feature; receiving a shared chart is free.
A share gives them exactly what publishing does: they can view it, play it, print it, and clone it into their own account, without the chart being listed publicly. Editing, publishing, sharing, and deleting stay yours alone: if a bandmate wants to change something, they clone it and the copy is theirs. Charts shared with you appear in a Shared with you list on your chart page, with a clone button on each row.
Publishing to the community
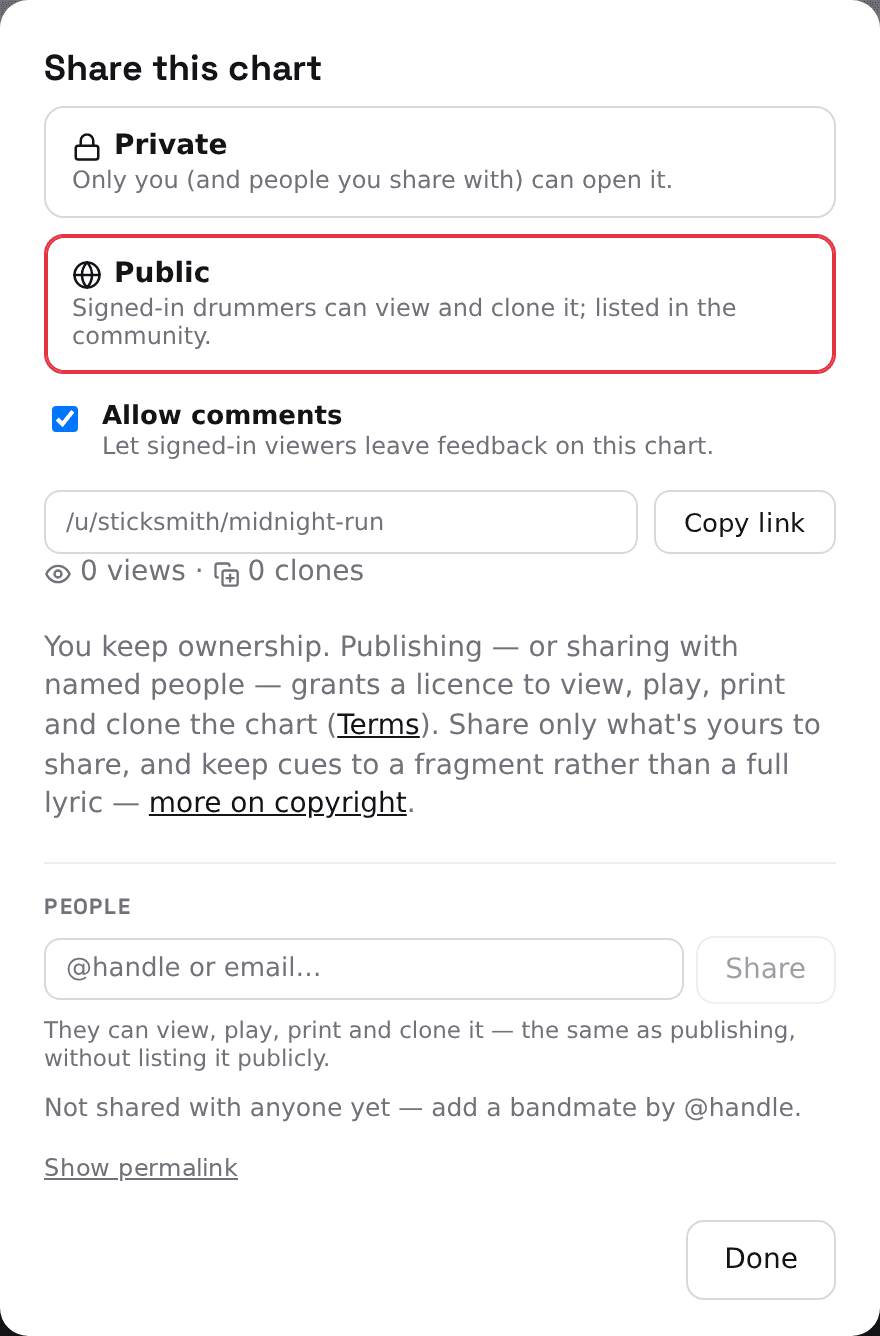
Flip a chart to Public (verified email required) and it's listed in the community: signed-in drummers can view it, play it, and clone it. Every public chart is clonable. You keep ownership; publishing
grants the community license (view, play, print, clone) described in the Terms. The share panel shows your chart's views and clones, and a Copy link for its friendly URL (/u/your-handle/chart-title).
That pretty URL follows the title, so retitling moves it. Use Show permalink in the share panel for the link that never changes.
One thing to keep in mind before you publish: a chart is your own work, but the Cues column can quote someone else's. Keep cues to a fragment that tells you where you are rather than the whole verse, and publish only what's yours to share. Copyright & takedowns explains why, and how to ask us to remove something.
Cloning
Cloning a public chart gives you an independent, private, fully editable copy in your account (it counts toward your chart cap) and credits the original. You can clone straight from the browse table's Clone button without opening the chart first.
The community page can be searched by title or artist and filtered by genre, and every column sorts: title, artist, genre, the author's @handle, comments, clones and last-updated, so you can find the busiest charts or the newest ones as easily as the most-cloned. It also carries a comment count per chart and, when you're signed in, a My charts toggle that narrows the list to your own published charts: the quickest way to see whether anything you shared has picked up comments.
Comments
Owners can allow comments on a public chart. Posting requires a signed-in, verified account; authors can delete their own comments, owners can delete any (or all), and anyone can ⚑ report a comment that crosses a line. Enough distinct reports hide it automatically pending moderator review.
11Gigs: setlists on stage
Gig Blazer (a Pro feature included in your 30-day trial) turns charts into an ordered setlist you page through on stage. A gig references your charts. Edit a chart and every gig shows the latest version; removing a chart from a gig never touches the chart itself.
- Build it: + new gig on the Gigs page, then + charts opens a picker of your charts. Reorder with the arrows beside each song in the setlist; add a date, venue, and notes under details ▾.
- Your gigs list: like your chart list, Gigs is a searchable, sortable, paged table (name, songs, date, venue, last updated). Each row has a duplicate action, which is how a residency or a weekly service gets next week's set: copy last week's and swap a few songs, sizes and all.
- Transition cues: each song has a yellow cue line, for example "count-in, segue…", shown between songs.
- On stage: swipe, tap a song, or use ←/→ to page through the set. One tap goes fullscreen, and the screen stays awake automatically for the whole gig. The small tab under the setlist collapses everything above and beside the chart: menus, gig bar, setlist and all, leaving the chart's own header line as the title bar, with the transition cue above it when the song has one. Need a mid-gig tweak? The chart's own View / Edit toggle drops it into the editor without leaving the set, and it saves as you go.
- Where the setlist sits: the three little buttons on the gig bar put it above the chart as a strip you swipe, down the left as a column, or away entirely. Each device remembers your choice. Above is the default because it gives the chart the most width, which matters most on a tablet in portrait. The column suits a wide landscape screen, where saving height matters more than the width it uses. When the list is longer than fits, arrows at its ends scroll it, and on a narrow screen it is always the strip, whichever you picked.
- Chart size, per song: the A− / A+ buttons in the chart's own title line size the song you are on, and that size is saved to this gig. The next song is untouched, the chart's own page is untouched, and the same chart in another gig keeps its own size. It is remembered on any device you open the set on, and it is the size the whole-setlist print and PDF come out at.
- Paper backup: the printer button on the gig bar holds both: print stacks the entire setlist for the browser's print dialog, and Download PDF (Pro) gives you the whole set as one server-rendered file. Either way it opens with a cover sheet: the gig's name, date and venue over a numbered running order with each song's bpm and transition cue, which is the page you hand the sound engineer. Fit to one page lives in that menu too and works per song, so a setlist comes out one sheet per chart (§09).
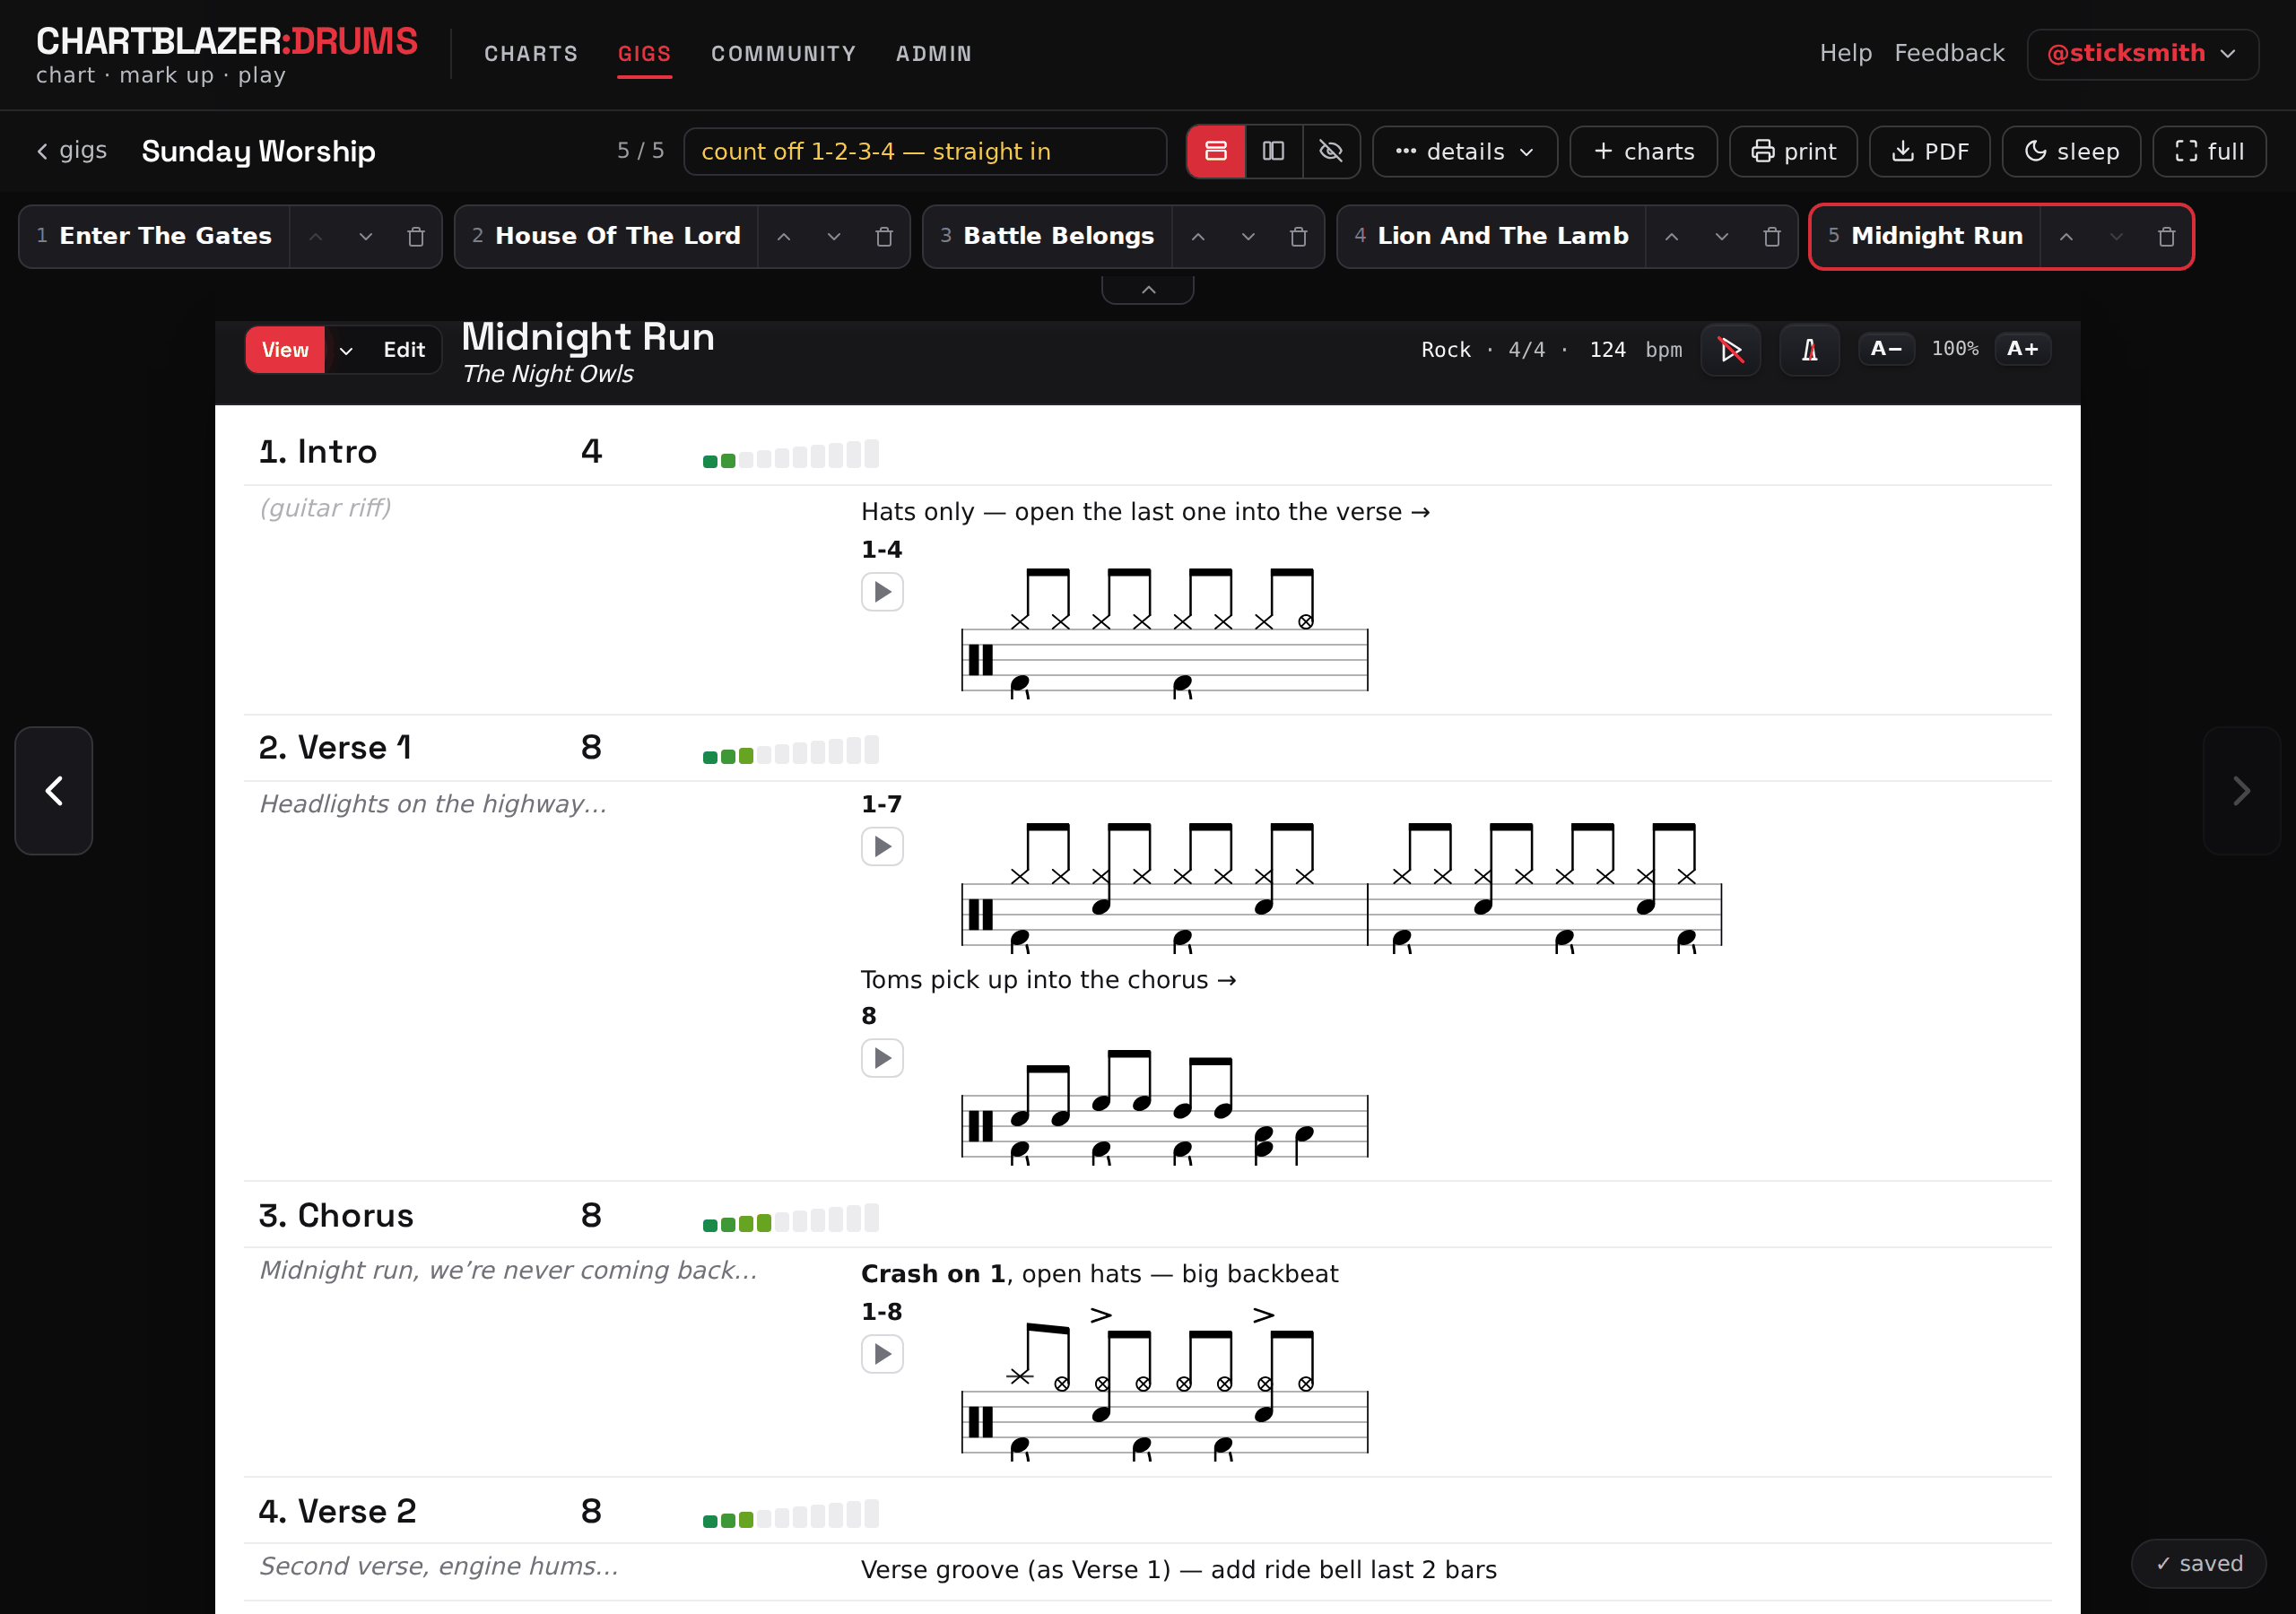
If your trial ends, gigs you built stay viewable and printable. You just can't create or edit setlists on the free plan.
12Keyboard shortcuts
Press ? anywhere in the editor for the in-app cheat sheet (it can show Windows or Mac keys). ⌘ below is Ctrl on Windows.
| ⌘+Z / ⌘+⇧+Z | Undo / redo any chart edit (a typing burst is one step; Ctrl+Y also redoes on Windows) |
| ⌘+Enter | Insert a section below the current one, cursor in its title |
| ⌘+↓ / ⌘+↑ | Jump to the next / previous section |
| ? | Open the tips & shortcuts sheet |
| ← / → | Previous / next chart on the gig stage (or swipe) |
13Your account & getting help
Managing your account
Click your @handle (top right) → Account. Top to bottom, that page holds:
- Profile: your handle and email, with verification status and a resend button.
- Password: change it here.
- Billing & plan: your current plan, upgrading and managing it, and the Have a code? box for redeeming a code (§02).
- Refer a drummer: mint and copy your referral link, and see who has signed up through it (§02).
- Email: the switch for product email, the occasional note about new features. This governs the address in your Profile card above. Turning it off never affects account email like verification, password resets, or anything about your subscription. You'll always hear about your own account.
- Delete account: at the very bottom, permanently removing your account and all its data after you type your email to confirm.
Log out lives in the same @handle menu.
Settings
Settings in the @handle menu holds your preferences, separate from your identity and billing, two cards:
- Standard view: which rows the step editor shows by default: the drum lanes, so a kit piece you never play stays out of the way, and the three marks (sticking, ensemble figure, time slashes), which start switched off. The editor's Standard / Expanded toggle flips between your set and everything there is, and a row with something written in it is never hidden (§05).
- Chart colors: which colour belongs to each kind of section, so auto-coloring paints your charts your way rather than ours. Out of the box only choruses (blue) and bridges (gold) carry one; every family gets its own swatch row, and Color a section as soon as I name it lives here too (§04).
My grooves
My grooves in the @handle menu is your saved-groove library: everything you've kept with save to library in the step editor (§05), each drawn on a real staff so you can tell Money 6/8 from Money 6/8 alt at a glance. Rename, edit, or delete them here; these are the same grooves Pick a groove offers alongside a chart's own grooves when you press + groove ▾ in any chart.
Getting help
Stuck, found a bug, or want a feature? Use Send feedback in your account menu. You can attach screenshots and it comes straight to us, or email support@infoblazer.com. Common questions are answered in the FAQ, and the support page has every way to reach us. A person answers support requests, usually within a day.
Keeping up
What's new in the site footer lists every release and what changed in it, and About in the @handle menu tells you which version you're on. The blog covers longer pieces about charting itself, such as how to build a chart or read one on stage, rather than the app.